
introduction
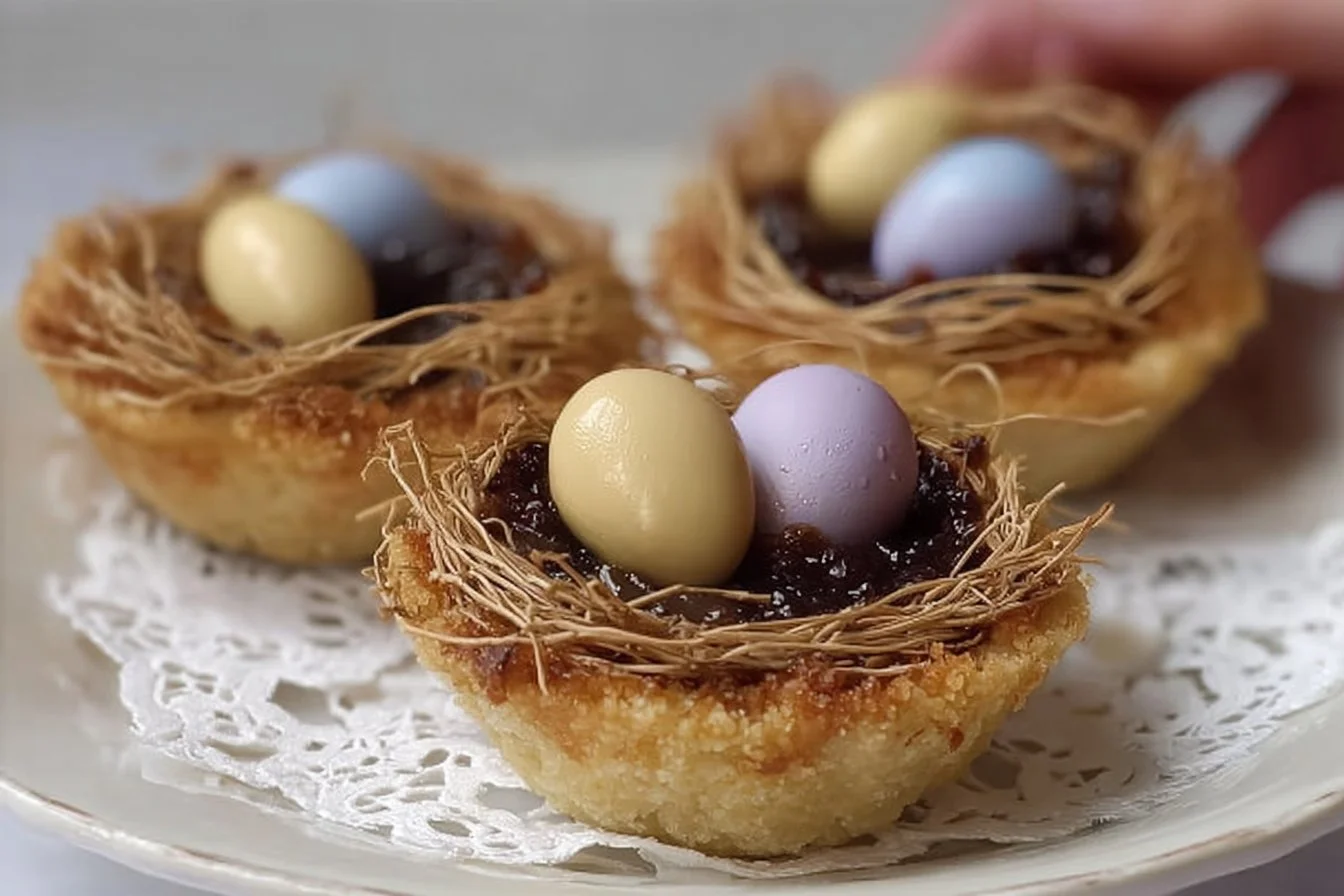
I was running late the Saturday before spring break, juggling soccer cleats, school projects, and a last-minute invite to a neighbor’s potluck. The kids wanted something cute and chocolatey, and I wanted something fast that still looked homemade. I pulled a pack of kataifi pastry from the freezer—something I keep for emergencies—grabbed the Nutella, and the little speckled eggs from the candy jar. In less than half an hour I had warm, crunchy nests filled with glossy chocolate and topped with candy eggs. The kids declared them “officially adorable,” and the neighbors asked for the recipe. These little tarts feel fancy but take almost no time, and they pack perfectly for a school treat, picnic, or simple dessert after dinner.
why make this recipe
This recipe works because it blends texture, taste, and speed. Kataifi pastry crisps up like a delicate shredded phyllo, giving a light crunch that contrasts the smooth, rich Nutella. The mini speckled chocolate eggs add color and a fun crunch that kids love. You need only a few pantry staples, and the method is straightforward. If you want a show-stopping plate without a lot of hands-on time, these nest tarts deliver. They fit well on dessert tables, make cute lunchbox surprises, and travel nicely for potlucks. For anyone who wants a high-impact, low-effort Easter dessert or everyday treat, this is a go-to recipe.
how to make Easter Egg Nest Tarts
Making these nests is about gentle shaping and quick baking. Start by loosening the kataifi strands so they can form small nests without clumping. Work in small handfuls, shaping the pastry around your fingers to make a shallow cup that will hold the filling. Bake until the nests turn a warm golden brown and feel crisp to the touch. Let them cool fully so Nutella doesn’t melt away, then spoon or pipe a modest amount into each nest. Finish with two or three mini speckled eggs on top for the classic “nest” look. The whole process moves fast, and most of the time is oven time, not active prep.
Ingredients :
Kataifi pastry, Nutella, Mini speckled chocolate Easter eggs
Directions :
- Preheat the oven to 350°F (175°C)., 2. Take the Kataifi pastry and lightly separate it to create nests., 3. Form the pastry into small nest shapes on a baking sheet., 4. Bake in the oven for about 10-15 minutes until golden brown and crispy., 5. Once cooled, fill each nest with Nutella., 6. Decorate the nests with mini speckled chocolate Easter eggs., 7. Serve and enjoy your adorable Easter treats!
how to serve Easter Egg Nest Tarts
Serve the nests at room temperature so the kataifi stays crisp and the Nutella keeps a silky texture. Arrange them on a small cake stand or a wooden board for a pretty presentation. For kids’ parties, place them on cupcake liners to make grabbing easy. If you bring them to a potluck, pack them in a shallow box with parchment between layers to avoid smudging. These tarts pair well with a simple cup of coffee or a tall glass of milk. For a brunch table, set them near other small sweets so guests can nibble a few without committing to a large slice.
how to store Easter Egg Nest Tarts
Store any leftovers in a single layer in an airtight container at room temperature for up to 24 hours to keep the kataifi crispy. If you must keep them longer, refrigerate for up to 3 days but expect some softness in the pastry. To help maintain crispness after chilling, let them sit at room temperature for 20–30 minutes before serving. Avoid stacking nests directly on top of one another; use parchment or paper liners between layers. Do not freeze filled nests—Nutella freezes fine, but the texture of the kataifi will suffer once thawed.
tips to make Easter Egg Nest Tarts
- Handle the kataifi gently. Take small handfuls and loosen the strands with your fingers rather than tearing. This helps create airy, even nests that bake crisp.
- Use a nonstick or lightly greased baking sheet. You can also use mini muffin tins to support the nest shape if you want uniform cups.
- Keep an eye on the oven the first time you bake them. Kataifi browns quickly; check at 8 minutes and then every couple of minutes to avoid over-browning.
- Cool nests completely before adding Nutella. Warm nests will cause the filling to melt and make the tarts messy.
- Warm the Nutella slightly (10–15 seconds in the microwave) if it’s stiff, so it’s easy to spoon or pipe without breaking the delicate pastry.
- For piping, transfer Nutella to a small zip-top bag, cut a tiny corner, and squeeze gently for neat dollops.
- Make the nests a few hours ahead and fill them just before serving to keep the best texture.
- If you need nut-free options, swap Nutella for a safe chocolate spread or a simple chocolate ganache made without nuts.
- For a glossy finish, brush a tiny bit of melted butter or neutral oil mixed with a pinch of sugar over nests before baking to encourage even browning.
variation (if any)
You can easily vary these tarts without changing the simple method. Swap Nutella for peanut butter and a drizzle of honey if your family prefers nutty flavors. Try a mascarpone whipped with a little powdered sugar and vanilla to create a lighter cream filling and top with tiny chocolate eggs for contrast. For a fruity version, add a small spoonful of raspberry jam under the chocolate or place a fresh berry beside the eggs. If you want a different look, use white chocolate spread and pastel candy eggs. If serving adults, add a sprinkle of flaky sea salt on top of the Nutella for a sweet-salty twist.
FAQs (minimum three FAQ)
Q: Can I make these nests in advance?
A: Yes. Bake the kataifi nests up to a day ahead and store them in an airtight container at room temperature. Fill them with Nutella just before serving to keep them crisp.
Q: What is kataifi pastry and where can I buy it?
A: Kataifi is a shredded phyllo pastry sold frozen or refrigerated in many grocery stores, Middle Eastern markets, and online. Thaw it in the fridge overnight if frozen, and handle gently when shaping.
Q: Can I use regular phyllo instead of kataifi?
A: You can, but the look and texture will change. Regular phyllo will give a flakier, layered cup rather than the fine, nest-like texture of kataifi. To mimic nests, cut phyllo into thin strips and layer loosely, but expect a different result.
Q: How do I keep the nests from collapsing after baking?
A: Make sure you form nests that are compact enough to hold their shape and bake until fully dry and golden. If you worry, bake them over a lightly greased mini muffin tin to support the sides while baking.
Q: Are these tarts safe for school events with nut restrictions?
A: Nutella contains hazelnuts, so it’s not safe for nut-free policies. Substitute a nut-free chocolate spread or a simple chocolate frosting made with cocoa, butter, and powdered sugar for school-safe treats.
Conclusion
If you want another creative nest idea, check out this similar take on potato-based nests for inspiration: Easter Egg Tart Potato Nests – Two Purple Figs. These kataifi and Nutella nests are fast, fun, and family-friendly—perfect for busy days when you want something special without a lot of work.

Easter Egg Nest Tarts
Ingredients
Method
- Preheat the oven to 350°F (175°C).
- Take the kataifi pastry and lightly separate it to create nests.
- Form the pastry into small nest shapes on a baking sheet.
- Bake in the oven for about 10-15 minutes until golden brown and crispy.
- Once cooled, fill each nest with Nutella.
- Decorate the nests with mini speckled chocolate Easter eggs.
- Serve and enjoy your adorable Easter treats!