

Every year, as the holiday season rolls around, I find myself with a heart full of nostalgia and joy, ready to transform our home into a cozy winter wonderland. One particular memory that lights up my spirit is a chilly December evening when my husband, Mark, decided to surprise our children with a movie night. It wasn’t just any movie night; this one was special. He had picked out a classic holiday film, twinkling lights danced around the room, and the aroma of freshly baked goodies wafted through our warm little haven.
As the snow softly blanketed the ground outside, I wanted to add something extra special to our cozy affair. That’s when I remembered the joy of making Candy Cane Marshmallows. These little treats are not just delightful to eat but also wonderful to make, especially with my kids. As their faces lit up at the thought of fluffy, pepperminty marshmallows that would melt in their mouths, I knew we were in for a fun evening in the kitchen.
There’s something magical about creating sweets together; it’s not just about the end product but about the laughter that fills the kitchen, the little spills that come with excitement, and the stories we share while waiting for our creation to set. My youngest, Lily, loves to be my little helper, while Jacob is more about taste-testing. “Just one more bite, Mom!” he always says, with those wide, innocent eyes that get me every time.
Candy Cane Marshmallows not only bring joy to our taste buds but also unify our family during the holidays. By making them together, we create a moment that we treasure each year, adding a new layer to our holiday traditions.
Why Make This Recipe
There are countless reasons why you might want to whip up a batch of Candy Cane Marshmallows. First and foremost, they make a beautiful and delectable addition to your holiday spread. Imagine serving these fluffy, pepperminty clouds alongside a steaming mug of hot cocoa topped with whipped cream. Not only do they taste incredible, but they also add a festive touch to any gathering. I love serving them at our holiday parties, where everyone can enjoy the sweet, creamy texture.
These marshmallows are also perfect for gifting. Wrapped in cellophane and tied with a bright red ribbon, they become a charming, homemade gift that shows your loved ones just how much you care. Each bite is like a little hug, evoking the warmth of the season.
Furthermore, this recipe is a fantastic way to get kids involved in cooking. It teaches them about measuring, mixing, and the science behind candy making, all while having fun with colors and flavors. For me, sharing the kitchen with my children creates memorable experiences that will last a lifetime.
How to Make Candy Cane Marshmallows
Creating Candy Cane Marshmallows is easier than you might expect, and I promise it’s a delightful way to spend time with your family.
Ingredients
Here’s what you’ll need to gather:
- 1 ⅓ cups water (divided)
- 3 envelopes unflavored powdered gelatin (about 7 ½ teaspoons)
- 1 ½ cups granulated sugar
- 1 cup light corn syrup
- 1 teaspoon peppermint extract
- ¼ teaspoon kosher salt
- 1-2 teaspoons red food coloring
- ⅓ cup powdered sugar or cornstarch (for rolling)
Directions
- Start by greasing a 9×9-inch baking pan with cooking spray and setting it aside.
- In the bowl of a stand mixer, add ⅔ cup of cold water, then sprinkle the gelatin on top and let it bloom. This step adds the magical texture to your marshmallows.
- In a medium saucepan over medium-high heat, combine the granulated sugar, corn syrup, and ⅔ cup of water. Stir until the sugar dissolves, then bring the mixture to a boil. This step takes about 10-12 minutes; just keep an eye on it and swirl the pan occasionally. You want to reach exactly 240°F on a candy thermometer—this temperature is crucial for getting that lovely marshmallow consistency.
- Once you hit the right temperature, immediately remove the saucepan from the heat.
- Keeping the stand mixer on low speed, slowly and carefully pour the melted sugar mixture into the bloomed gelatin. Add in the peppermint extract and salt for that refreshing burst of flavor.
- Gradually increase the speed to high and whip until the mixture becomes stiff and white, which usually takes about 10-12 minutes. You’ll know it’s ready when stiff peaks form and take a few seconds before falling back into the mixture.
- Quickly pour the marshmallow mixture into your prepared baking pan and use a spatula to spread it evenly.
- While the marshmallow is still warm, add droplets of red food coloring to the top. Use a toothpick or skewer to swirl the colors throughout the marshmallows, creating that festive candy cane effect.
- Allow the marshmallows to sit and firm up for at least 4 hours at room temperature or 2 hours in the refrigerator.
- Dust your work surface with powdered sugar or cornstarch. Use a butter knife to slice around the edges of the pan, then turn the marshmallow out onto the prepared surface. If needed, carefully pry it out from a corner.
- Cut the marshmallows into at least 16 pieces with a sharp knife. You might want to spray the knife with cooking spray to prevent sticking.
- Finally, roll each marshmallow in powdered sugar or cornstarch on all sides to keep them from sticking together.
How to Serve Candy Cane Marshmallows
There are so many delightful ways to serve Candy Cane Marshmallows. Of course, they are fantastic on their own, but why stop there? You can drop a few into your steaming mug of hot chocolate for a dreamy blend of sweetness. My kids love watching the marshmallows float and slowly melt while we sip our cocoa and recount our favorite holiday moments.
You can also use these marshmallows as toppings for ice cream sundaes. Just imagine the fluffy texture paired with rich chocolate or vanilla ice cream—pure bliss! During parties, I love to display them on a pretty platter alongside chocolate-dipped pretzel rods or homemade cookies for a delightful dessert spread.
How to Store Candy Cane Marshmallows
To maintain freshness, store your Candy Cane Marshmallows in an airtight container. I prefer to separate the layers with a bit of wax paper or parchment to prevent them from sticking together. If kept properly, they should last for about two weeks. However, we always seem to devour them well before that!
Tips to Make Candy Cane Marshmallows
- Use a candy thermometer to ensure accurate temperatures. Marshmallows can be tricky, and the right consistency hinges on it!
- Don’t rush the whipping step. The fluffiness of the marshmallows depends on it being whipped properly and reaching the right peaks.
- Feel free to adjust the amount of peppermint extract to suit your taste. If you love a strong peppermint flavor, add a bit more!
- Kids love to help! Invite them to sprinkle the powdered sugar or to swirl the colors into the marshmallows.
Variation
If you want to add a twist to your Candy Cane Marshmallows, consider incorporating different flavors. A touch of vanilla or chocolate can add an exciting element. You can also mix in tiny chocolate chips or crushed peppermint candies for an extra crunch.
FAQs
1. Can I use flavored gelatin instead of unflavored?
No, it’s best to stick with unflavored gelatin for this recipe to achieve the desired marshmallow texture.
2. What if I don’t have a stand mixer?
You can use a handheld mixer, but it may take longer to whip the mixture to stiff peaks. Just be prepared for a bit more effort!
3. Can I freeze Candy Cane Marshmallows?
While it’s not recommended because the texture can change once thawed, you can keep them in the fridge to prolong their freshness.
As the evening wore on and we gathered around the living room, our Candy Cane Marshmallows in hand, I was filled with gratitude. Each laugh shared with my family, every bite of our homemade creation, made the holiday season feel complete. So, whether you’re building memories with your family or sharing these treats with friends, I hope you find as much joy in making and enjoying Candy Cane Marshmallows as I do.
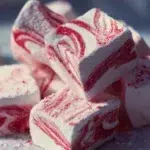
Candy Cane Marshmallows
Ingredients
Method
- Grease a 9x9-inch baking pan with cooking spray and set aside.
- In the bowl of a stand mixer, combine ⅔ cup of cold water and sprinkle the gelatin on top. Let it bloom.
- In a medium saucepan over medium-high heat, combine granulated sugar, corn syrup, and ⅔ cup of water. Stir until sugar dissolves and bring to a boil, about 10-12 minutes.
- Cook until the mixture reaches exactly 240°F on a candy thermometer, then remove from heat.
- With the stand mixer on low speed, slowly pour the hot sugar mixture into the bloomed gelatin. Add peppermint extract and salt.
- Gradually increase speed to high and whip until the mixture is stiff and white, about 10-12 minutes.
- Pour marshmallow mixture into prepared baking pan and spread evenly.
- While marshmallow is still warm, add red food coloring droplets and swirl with a toothpick.
- Let the marshmallows sit at room temperature for at least 4 hours or refrigerate for 2 hours.
- Dust work surface with powdered sugar or cornstarch. Slice around the edges of the pan and turn out onto the prepared surface.
- Cut marshmallows into at least 16 pieces and roll in powdered sugar or cornstarch to prevent sticking.